A Guide to using NYU's High Performance Computing
 September 25, 2023
This guide contains information on how to use NYU's High Performance Computing (HPC) resources. It is meant for students and faculty members who have access to NYU's HPC resources.
This is a work in progress [Updated: 25th September 2023]
Account Setup
Log in to NYU Identity Management service and click on Request HPC account. You will need to fill out a form, get an NYU faculty sponsor, and wait for the approval.
Accessing the HPC
Once you get the approval, you can configure your SSH client to access the HPC. Open your terminal/SSH client and:
-
If you are on the NYU Network, you can SSH directly into Greene:
ssh <netid>@greene.hpc.nyu.edu -
If you are not on the NYU Network, you will need to SSH into a gateway server first:
ssh <netid>@gw.hpc.nyu.eduThen from there, SSH into Greene:
ssh <netid>@greene.hpc.nyu.edu
In both the cases, you will be prompted for your NYU password. Once you enter your password, you will be logged into Greene.
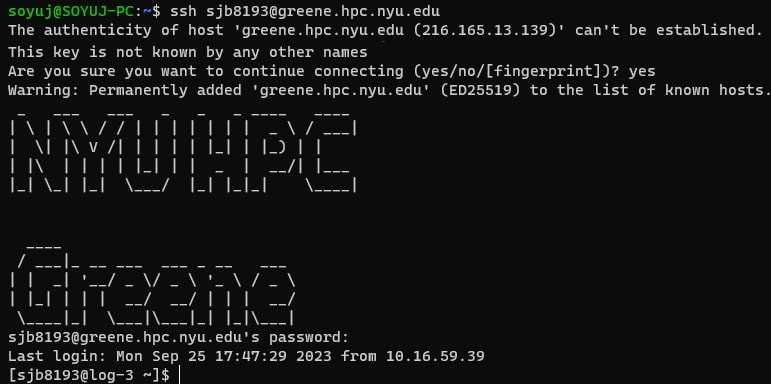
Note: When we login to the HPC, we are in the login node as denoted by
log-3in the screenshot. We should not run any compute intensive jobs on the login node.
Storage
The HPC has a number of storage options available. The most important ones are:
$HOME
- This is our personal user home space that is best for small code files.
- It is backed up and not flushed.
- At the time of writing this blog, the quota for $HOME is 50 GB of disk space and 30k files.
$SCRATCH
- This space is best for large files.
- It is not backed up and files not accessed for 60 days are flushed.
- At the time of writing this blog, the quota for $SCRATCH is 5 TB of disk space and 1M files.
File Transfer
The easiest way to transfer files to the HPC is using scp. The transfer needs to be made using Data Transfer Node (DTN):
scp <file> <netid>@dtn.hpc.nyu.edu:/scratch/<netid>This file will be transferred to the $SCRATCH directory. To copy directories recursively, use the -r flag.
Requesting Resources
Computationally intensive jobs should be run on the compute nodes. There are 2 ways to run tasks on a compute node:
Interactive Mode
It is useful for debugging and testing. We can run a task on a compute node interactively and see the output in real time.
Note: If we quit our terminal while running in interactive mode, our job will be killed.
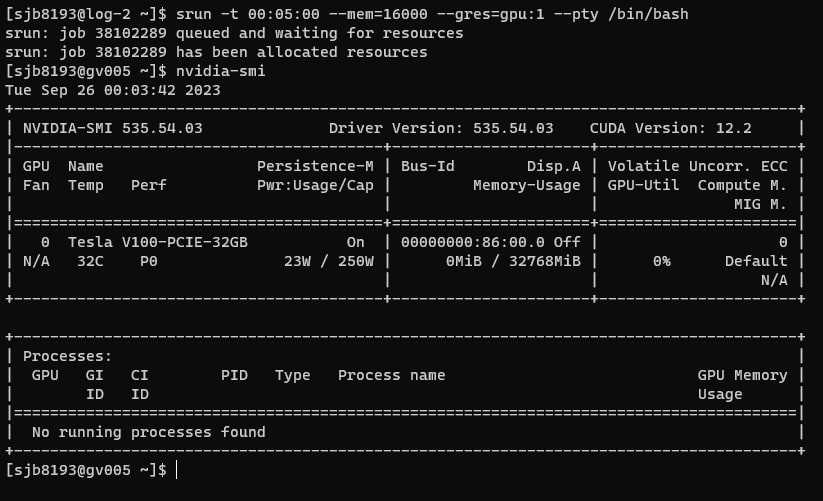
To use compute nodes in interactive mode, we need to use srun specifying how long we want the node for, and the resources we need:
srun -t 00:05:00 --mem=16000 --gres=gpu:1 --pty /bin/bashHere:
-tspecifies the time duration in HH:MM:SS.--memspecifies the RAM--gres=gpu:1specifies the number of GPUs
After the resources have been allocated, we will be logged into the compute node:
Batch Mode
We can also queue up jobs in batch mode by listing the required resources and commands in a file:
main.py
print('Hello world')batchscript.s
#!/bin/bash
#SBATCH --nodes=1
#SBATCH --ntasks-per-node=1
#SBATCH --cpus-per-task=1
#SBATCH --time=00:05:00
#SBATCH --mem=16GB
#SBATCH --job-name=myTrainingJob
#SBATCH --mail-type=ALL
#SBATCH --mail-user=<netid>@nyu.edu
#SBATCH --output=myJobOutput_%j.out

# COMMANDS TO INSTALL PACKAGES AND RUN OUR CODE
module purge
module load python/intel/3.8.6

python main.py
Here:
--outputis for the output log file.%jis a placeholder for the job number. This allows the file name to be unique and easy to identify.- We will cover modules in the next section.
Then, we will queue the file as:
sbatch batchscript.sThis will print a job number to the screen to confirm that our job has been added to the queue.
We can check out queue using:
squeue -u <netid>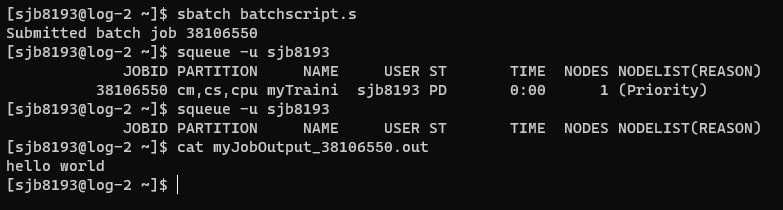

Example
Here is an example of a batch script that trains a model on the HPC:
#!/bin/bash
#SBATCH --nodes=1
#SBATCH --ntasks-per-node=1
#SBATCH --cpus-per-task=2
#SBATCH --gres=gpu:4
#SBATCH --mem=64GB
#SBATCH --time=47:59:59
#SBATCH --job-name=DeepPairwiseImpact
#SBATCH --mail-type=ALL
#SBATCH --mail-user=soyuj@nyu.edu
#SBATCH --output=DeepPairwiseImpact

module load cuda/11.6.2
module load cudnn/8.6.0.163-cuda11

cd $HOME/improving-learned-index
torchrun --standalone --nproc_per_node=gpu -m src.deep_impact.train \
  --triples_path /scratch/sjb8193/qidpidtriples.train.small.tsv \
  --queries_path /scratch/sjb8193/queries.train.tsv \
  --collection_path /scratch/sjb8193/expanded_collection.tsv \
  --checkpoint_dir /scratch/sjb8193/checkpoints \
  --batch_size 64 \
  --save_every 5000